This guide walks you through setting up SAML-based Single Sign-On (SSO) between Auth0 and StatusDrift. Auth0’s flexible identity platform allows you to connect StatusDrift with your existing user database, social providers, or enterprise identity systems.
Prerequisites
Before you begin, ensure you have:
- Auth0 account with Admin access
- StatusDrift Organization Owner or Admin role
- A StatusDrift plan that includes SSO (Team or Enterprise)
Step 1: Start SAML Configuration in StatusDrift
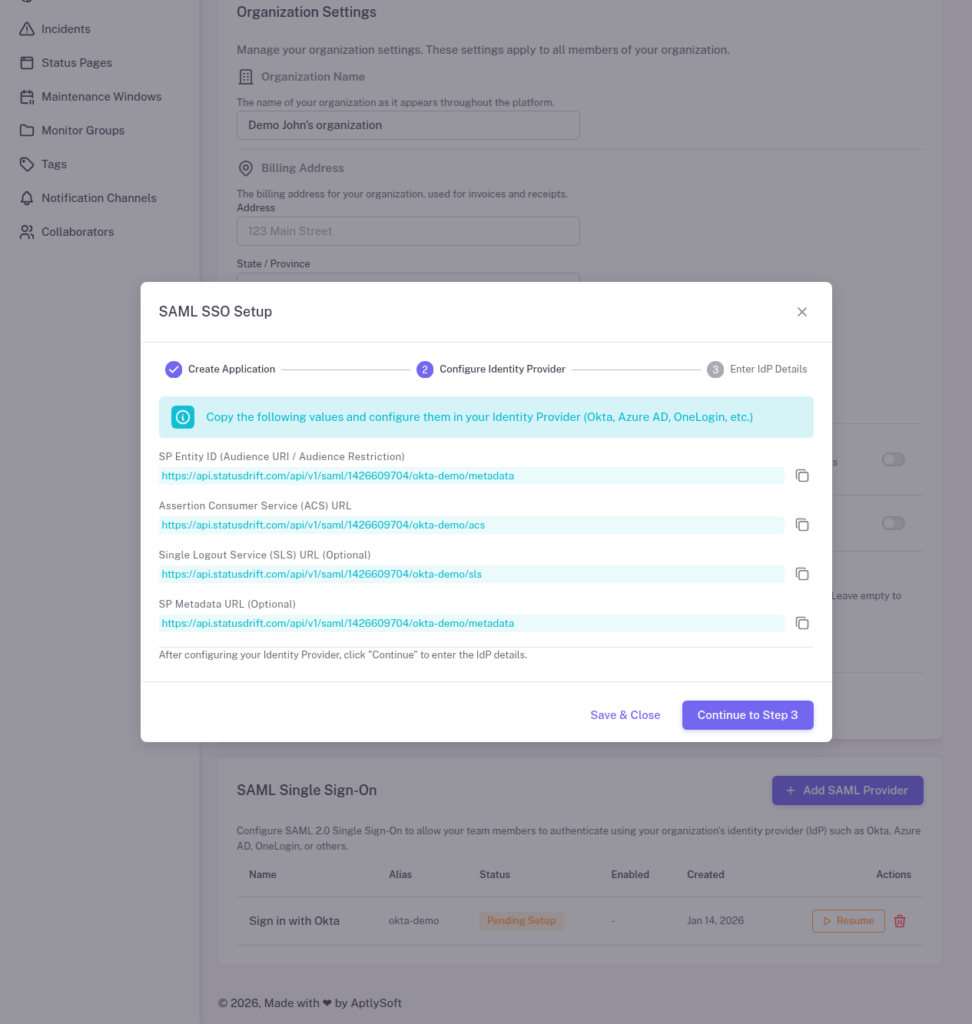
1. Sign in to StatusDrift and navigate to Organization Settings > Security > Single Sign-On.
2. Click Configure SSO and select Auth0 from the identity provider list (or choose “Other SAML 2.0 Provider”).
3. StatusDrift will display your Service Provider (SP) metadata. Keep this page open – you will need these values:
- ACS URL (Assertion Consumer Service URL) – Where Auth0 sends SAML responses
- Entity ID (Audience) – StatusDrift’s unique identifier
- SLS URL – Single Logout Service URL
Step 2: Create an Application in Auth0
1. Sign in to the Auth0 Dashboard.
2. Navigate to Applications > Applications.
3. Click + Create Application.
4. Enter a name (e.g., “StatusDrift”) and select Regular Web Applications.
5. Click Create.
Step 3: Enable SAML2 Web App Addon
Auth0 uses “Addons” to enable SAML functionality:
1. In your application settings, navigate to the Addons tab.
2. Enable the SAML2 Web App addon by clicking on it.
3. In the Settings tab of the addon modal, configure the following:
{
  "audience": "YOUR_STATUSDRIFT_ENTITY_ID",
  "recipient": "YOUR_STATUSDRIFT_ACS_URL",
  "destination": "YOUR_STATUSDRIFT_ACS_URL",
  "nameIdentifierFormat": "urn:oasis:names:tc:SAML:1.1:nameid-format:emailAddress",
  "nameIdentifierProbes": [
    "http://schemas.xmlsoap.org/ws/2005/05/identity/claims/emailaddress"
  ]
}
Replace the placeholder values with the actual values from StatusDrift’s SP metadata.
Step 4: Configure Attribute Mappings
Add attribute mappings to the SAML2 addon configuration to pass user information to StatusDrift:
{
  "audience": "YOUR_STATUSDRIFT_ENTITY_ID",
  "recipient": "YOUR_STATUSDRIFT_ACS_URL",
  "destination": "YOUR_STATUSDRIFT_ACS_URL",
  "nameIdentifierFormat": "urn:oasis:names:tc:SAML:1.1:nameid-format:emailAddress",
  "nameIdentifierProbes": [
    "http://schemas.xmlsoap.org/ws/2005/05/identity/claims/emailaddress"
  ],
  "mappings": {
    "email": "http://schemas.xmlsoap.org/ws/2005/05/identity/claims/emailaddress",
    "firstName": "http://schemas.xmlsoap.org/ws/2005/05/identity/claims/givenname",
    "lastName": "http://schemas.xmlsoap.org/ws/2005/05/identity/claims/surname"
  },
  "passthroughClaimsWithNoMapping": false
}
Click Enable to save the addon configuration.
Step 5: Get Auth0 IdP Metadata
After enabling the SAML2 addon, navigate to the Usage tab in the addon modal. You’ll find:
- Identity Provider Login URL – The SSO endpoint
- Identity Provider Certificate – Download the X.509 certificate
- Issuer – Auth0’s Entity ID (typically
urn:YOUR_TENANT.auth0.com)
You can also download the complete IdP metadata XML from this tab.
Step 6: Configure Connections (Optional)
Auth0 allows you to configure which identity sources (connections) users can authenticate with:
1. In your application, navigate to the Connections tab.
2. Enable the connections you want to allow:
- Database – Auth0’s built-in user database
- Social – Google, GitHub, LinkedIn, etc.
- Enterprise – ADFS, Azure AD, LDAP, SAML, etc.
This flexibility allows Auth0 to act as an identity broker, federating authentication from multiple sources.
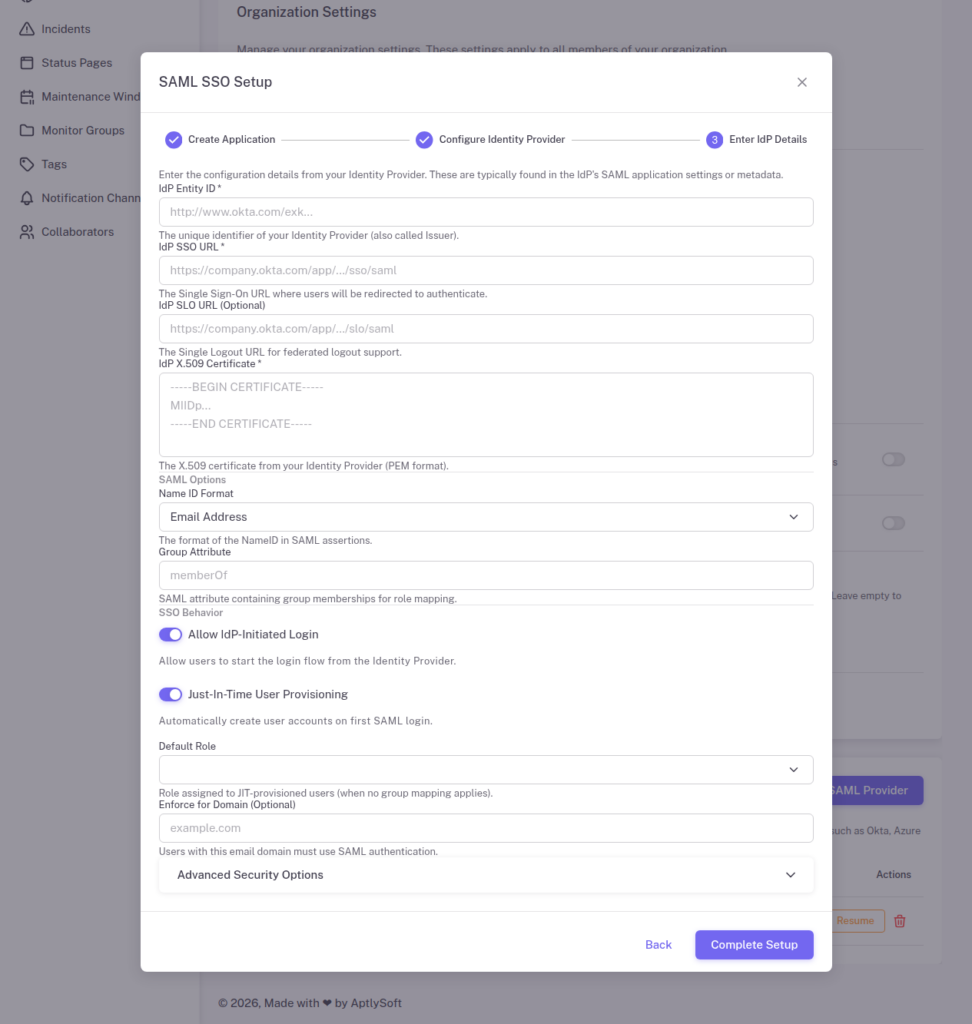
Step 7: Complete Configuration in StatusDrift
Return to StatusDrift and enter the Auth0 IdP details:
1. Identity Provider Entity ID: The Issuer from Auth0 (e.g., urn:your-tenant.auth0.com)
2. Single Sign-On URL: The Identity Provider Login URL from Auth0
3. X.509 Certificate: Paste the certificate downloaded from Auth0
4. Configure optional settings:
- Just-In-Time Provisioning – Automatically create StatusDrift accounts for new users
- Require SSO – Force all users to authenticate via Auth0
5. Click Save Configuration.
Step 8: Configure Role Mapping with Auth0 Rules
To pass role information to StatusDrift, you can use Auth0 Actions (or legacy Rules) to add a groups claim:
1. In Auth0, navigate to Actions > Flows > Login.
2. Click + to add a custom action.
3. Create an action that adds roles to the user’s SAML assertion:
exports.onExecutePostLogin = async (event, api) => {
  const namespace = 'https://statusdrift.com';

  // Get roles from user metadata or app_metadata
  const roles = event.user.app_metadata?.roles || ['Viewer'];

  // Add roles to SAML assertion
  api.samlResponse.setAttribute('groups', roles);
};
4. Deploy the action and add it to the Login flow.
Then configure role mapping in StatusDrift:
1. Go to Organization Settings > Security > SSO > Role Mapping.
2. Map Auth0 roles to StatusDrift roles accordingly.
Testing Your Configuration
Before enforcing SSO for all users:
1. Open an incognito/private browser window.
2. Navigate to your StatusDrift login page.
3. Click Sign in with SSO or enter your organization’s SSO domain.
4. You should be redirected to Auth0’s Universal Login page.
5. Authenticate with your chosen method (database, social, or enterprise connection).
6. After authenticating, you should be redirected back to StatusDrift and signed in.
Troubleshooting
Error: “Invalid callback URL”
The ACS URL in your SAML2 addon configuration doesn’t match StatusDrift’s expected URL. Verify the recipient and destination values match the ACS URL from StatusDrift exactly.
Error: “Audience mismatch”
The audience value in your SAML2 addon doesn’t match StatusDrift’s Entity ID. Copy the exact Entity ID value from StatusDrift’s SP metadata.
Error: “No email in SAML response”
The NameID is not configured to use email format. Ensure your SAML2 addon configuration includes the correct nameIdentifierFormat and nameIdentifierProbes settings.
Social login not working
Verify that the social connection is enabled for your StatusDrift application in Auth0’s Connections tab. Also check that the social provider (e.g., Google) is properly configured in Auth0.
Advanced: Auth0 Organizations
If you’re using Auth0 Organizations for multi-tenant scenarios:
1. Create an Organization in Auth0 for each of your customers.
2. Enable the StatusDrift application for each Organization.
3. Configure Organization-specific connections (e.g., each customer’s own IdP).
4. Use the Organization ID in the SAML assertion to route users to the correct StatusDrift organization.
Security Best Practices
- Enable Attack Protection – Configure Auth0’s brute force protection, breached password detection, and bot detection
- Require MFA – Use Auth0’s MFA capabilities for additional security
- Customize Universal Login – Brand your login page while ensuring security best practices
- Monitor Logs – Use Auth0’s logging and monitoring features to track authentication events
- Rotate Signing Keys – Auth0 allows certificate rotation; coordinate with StatusDrift when rotating
- Use Anomaly Detection – Enable Auth0’s anomaly detection to identify suspicious login patterns