This guide walks you through configuring SAML Single Sign-On (SSO) between Microsoft Entra ID (formerly Azure Active Directory) and StatusDrift. After completing this setup, your team members can authenticate to StatusDrift using their Microsoft 365 or Azure AD credentials.
Prerequisites
- Microsoft Entra ID (Azure AD) with administrator access
- A StatusDrift account with Admin role
- Microsoft 365 or Azure subscription with Entra ID
Step 1: Create a SAML Application in StatusDrift
- Log in to StatusDrift and navigate to Account Settings
- Select the Organization tab
- Scroll down to SAML Single Sign-On and click Add SAML Provider
- Enter the following details:
- Alias: azure-ad (or a unique identifier)
- Display Name: Sign in with Microsoft
- Click Create & Continue
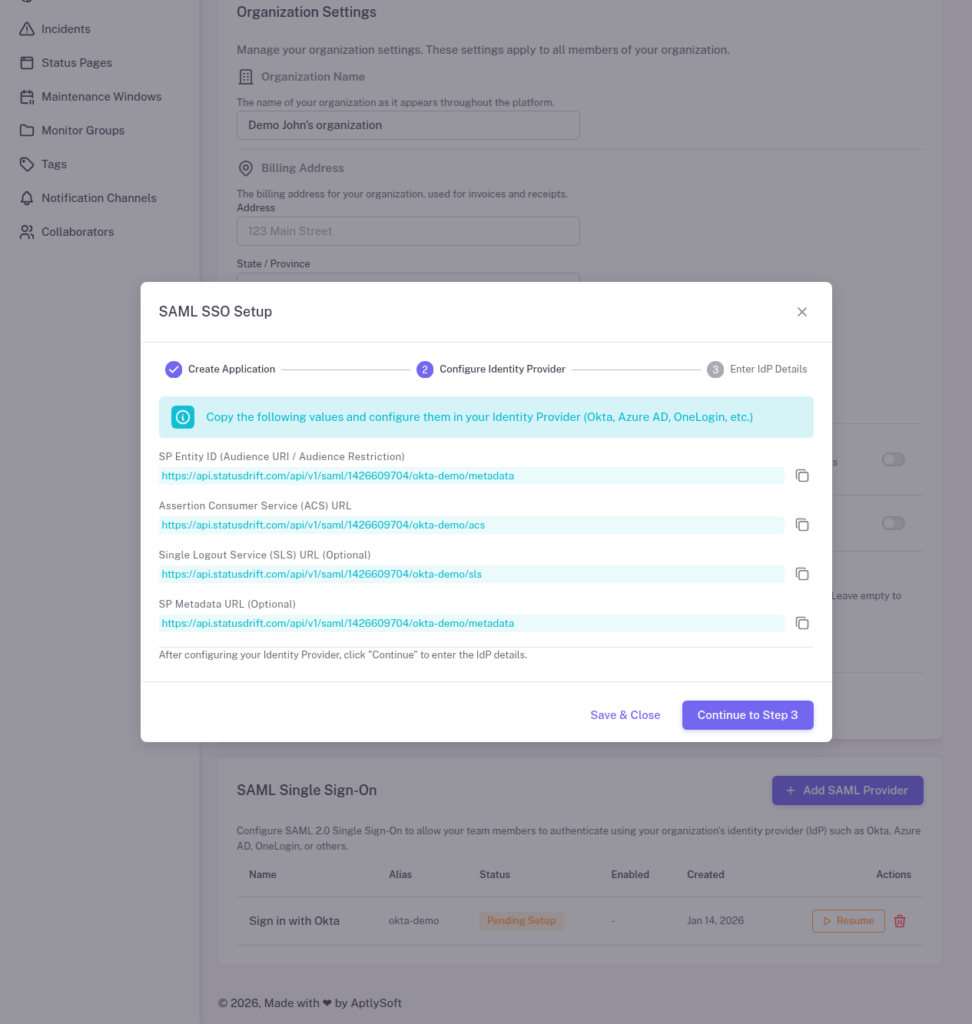
Step 2: Copy StatusDrift SP Metadata
After creating the SAML application, StatusDrift displays the Service Provider (SP) metadata. Copy these values for the Azure AD configuration:
- SP Entity ID (Identifier): Copy this URL
- Assertion Consumer Service (ACS) URL (Reply URL): Copy this URL
- Single Logout Service (SLS) URL: Copy this URL (optional)
Step 3: Create an Enterprise Application in Azure
- Sign in to the Microsoft Entra admin center (entra.microsoft.com)
- Navigate to Identity > Applications > Enterprise applications
- Click New application
- Click Create your own application
- Enter a name (e.g., “StatusDrift”)
- Select Integrate any other application you don’t find in the gallery (Non-gallery)
- Click Create
Step 4: Configure SAML Single Sign-On
- In your new application, go to Single sign-on in the left menu
- Select SAML as the single sign-on method
- In the Basic SAML Configuration section, click Edit
Basic SAML Configuration
| Setting | Value |
|---|---|
| Identifier (Entity ID) | Paste the SP Entity ID from StatusDrift |
| Reply URL (ACS URL) | Paste the ACS URL from StatusDrift |
| Sign on URL | https://app.statusdrift.com/login |
| Logout URL (Optional) | Paste the SLS URL from StatusDrift |
- Click Save
Step 5: Configure Attributes and Claims
- In the Attributes & Claims section, click Edit
- Verify the following claims are configured:
Required Claims
| Claim Name | Source Attribute |
|---|---|
| Unique User Identifier (Name ID) | user.userprincipalname or user.mail |
| emailaddress | user.mail |
| givenname | user.givenname |
| surname | user.surname |
Adding Group Claims (For Role Mapping)
To pass group memberships for automatic role assignment:
- Click Add a group claim
- Select Security groups or Groups assigned to the application
- Under Source attribute, select Group ID or Display Name
- Optionally customize the claim name (default is “groups”)
- Click Save
Note: If using Group IDs, you will need to use the Azure AD group Object ID when creating mappings in StatusDrift.
Step 6: Download Azure AD Metadata
- In the SAML Certificates section, locate:
- App Federation Metadata Url – You can use this URL or download the certificate
- Certificate (Base64) – Click Download
- In the Set up StatusDrift section, copy:
- Login URL (IdP SSO URL)
- Azure AD Identifier (IdP Entity ID)
- Logout URL (IdP SLO URL)
Step 7: Complete Setup in StatusDrift
- Return to the StatusDrift SAML setup wizard
- Click Continue to Step 3
- Enter the Azure AD IdP details:
- IdP Entity ID: Paste the Azure AD Identifier
- IdP SSO URL: Paste the Login URL
- IdP SLO URL: Paste the Logout URL (optional)
- IdP X.509 Certificate: Open the downloaded certificate and paste the contents
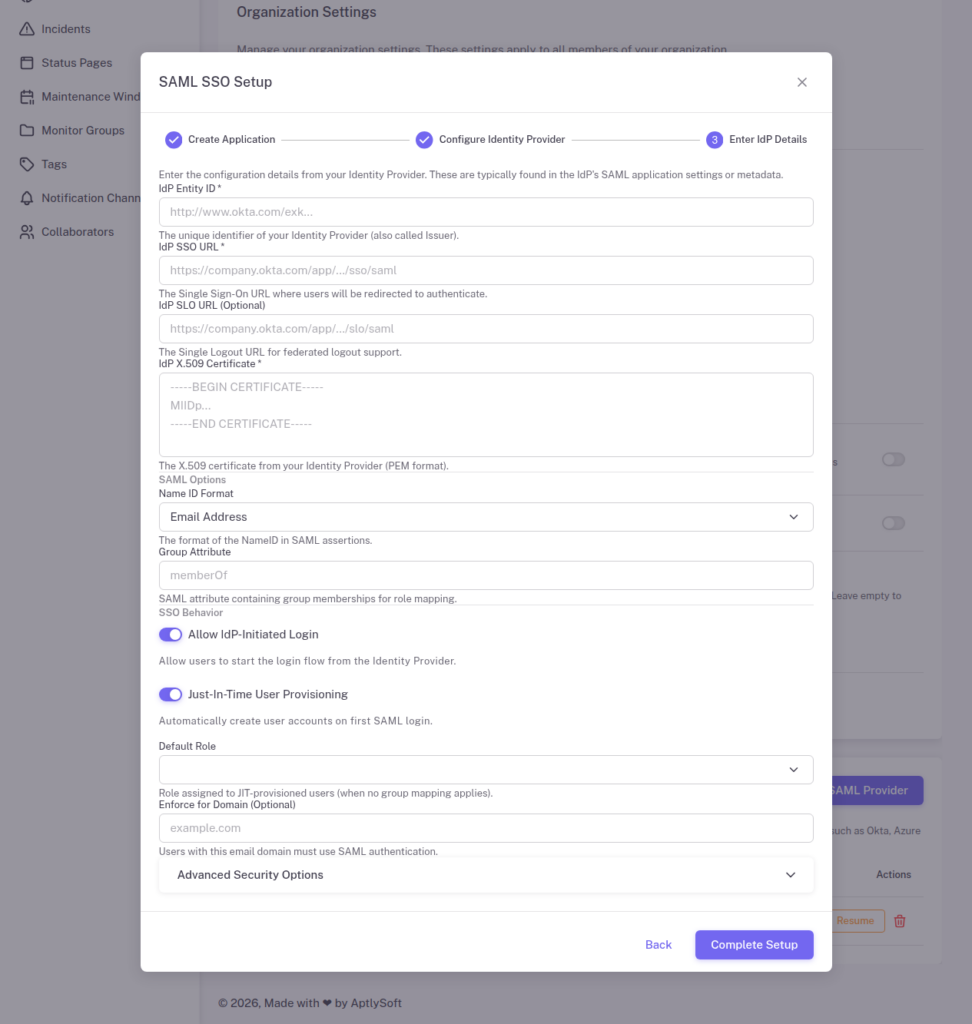
Configure SSO Behavior
- Allow IdP-Initiated Login: Enable for Azure AD portal access
- Just-In-Time User Provisioning: Enable to auto-create accounts
- Default Role: Select the role for new users
- Group Attribute: Enter “groups” or your custom claim name
- Click Complete Setup
Step 8: Assign Users and Groups in Azure AD
- In your Azure AD enterprise application, go to Users and groups
- Click Add user/group
- Select users or groups who should have access to StatusDrift
- Click Assign
Important: Users must be assigned to the application in Azure AD before they can authenticate.
Step 9: Configure Group Mappings in StatusDrift (Optional)
To map Azure AD groups to StatusDrift roles:
- In StatusDrift, go to your SAML provider settings
- Click Manage Group Mappings
- Click Add Mapping
- Enter the Azure AD group name (or Object ID if using Group IDs)
- Select the corresponding StatusDrift role
- Save your mappings
Example Group Mappings
| Azure AD Group | StatusDrift Role | Target |
|---|---|---|
| StatusDrift-Admins | Admin | Organization |
| StatusDrift-DevOps | Global Editor | Organization |
| StatusDrift-Support | Global Communication | Organization |
| StatusDrift-Managers | Global Viewer | Organization |
Testing the Integration
- Open an incognito/private browser window
- Navigate to the StatusDrift login page
- Click Sign in with SSO
- Enter your organization’s SSO alias (e.g., “azure-ad”)
- You will be redirected to Microsoft login
- After authentication, you will be redirected back to StatusDrift
Users can also access StatusDrift directly from the Microsoft 365 app launcher or My Apps portal if IdP-initiated login is enabled.
Troubleshooting
AADSTS50105: User Not Assigned
This error occurs when the user is not assigned to the enterprise application. Assign the user or their group in Azure AD.
AADSTS700016: Application Not Found
Verify the Identifier (Entity ID) in Azure AD exactly matches the SP Entity ID from StatusDrift.
Certificate Errors
Ensure you are using the Base64 encoded certificate. Open the downloaded .cer file in a text editor and copy the entire contents including the BEGIN/END lines.
Groups Not Appearing
Check that:
- Group claims are configured in Azure AD
- The user is a member of the group
- If using “Groups assigned to the application”, the group must be assigned to the app
- The Group Attribute in StatusDrift matches the claim name
Conditional Access Policies
You can apply Azure AD Conditional Access policies to the StatusDrift application for additional security:
- Require multi-factor authentication
- Block access from untrusted locations
- Require compliant devices
- Set session controls
Configure these in Identity > Protection > Conditional Access.