As your monitoring setup grows, organizing monitors into logical groups becomes essential. Monitor groups let you categorize your monitors by environment, service type, team ownership, or any other classification that makes sense for your organization.
Why Use Monitor Groups
Monitor groups provide several benefits:
- Better organization – Find monitors quickly instead of scrolling through a long list
- Team access control – Grant specific team members access to only the groups they need
- Status page content – Display monitors from specific groups on your public status pages
- Quick status overview – See the health of an entire service category at a glance
Creating a Monitor Group
To create a new monitor group:
- Navigate to Monitor Groups in the sidebar
- Click the Add Group button
- Enter a descriptive name for your group (e.g., “Production Services” or “API Endpoints”)
- Click Create
Your new group will appear in the groups list, ready to have monitors assigned to it.
Adding Monitors to a Group
You can assign monitors to groups in two ways:
When Creating a New Monitor
On the Add Monitor page, you will see a Monitor Group (Optional) dropdown. Select your desired group before creating the monitor.
For Existing Monitors
Edit any existing monitor and update the Monitor Group field to move it to a different group or assign it to a group for the first time.
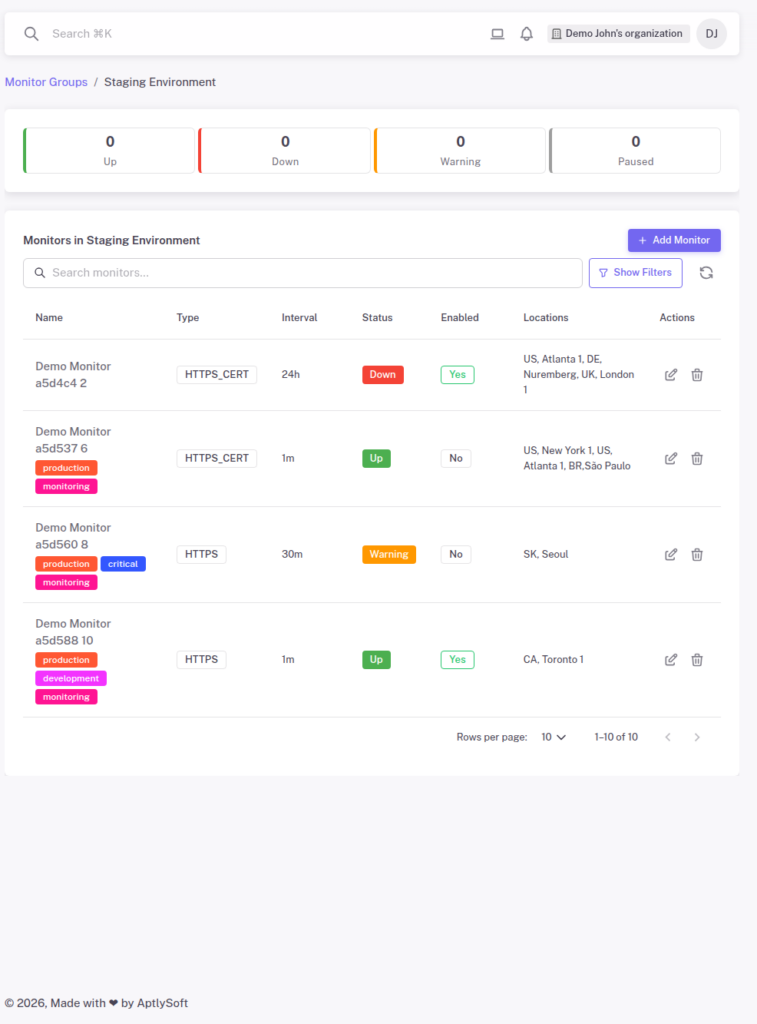
Viewing Group Details
Click on any group name to view its detail page. Here you will find:
- Status summary – Cards showing counts of Up, Down, Warning, and Paused monitors
- Monitors table – All monitors in the group with their type, interval, status, and location
- Filters – Filter monitors by status, type, location, or tags
- Add Monitor – Quick link to add a new monitor directly to this group
Group-Based Access Control
One of the most powerful features of monitor groups is role-based access control. When inviting collaborators, you can assign them the “Member (Group Access)” role with specific permissions for individual groups:
- View – Read-only access to monitors in the group
- Editor – Can edit monitors in the group
- Communication – Can manage incidents for monitors in the group
This allows you to give your development team editor access to staging monitors while restricting production access to senior engineers. See Team Access and Monitor Group Permissions for detailed setup instructions.
Common Use Cases
Environment-Based Groups
- Production Services
- Staging Environment
- Development Systems
Service-Based Groups
- API Endpoints
- Frontend Applications
- Database Servers
- Third-Party Integrations
Team/Department Groups
- Platform Team
- Customer Portal
- Mobile Backend
Best Practices
- Use clear, descriptive names – Group names should be immediately understandable to anyone on your team
- Keep groups focused – Each group should represent a logical collection of related monitors
- Combine with tags – Use tags for cross-cutting concerns that span multiple groups
- Plan for access control – Consider how you will assign team permissions when designing your group structure
- Review periodically – As your infrastructure evolves, update your groups to reflect current organization
Next Steps
- Using Tags to Categorize Monitors – Learn how tags complement groups for flexible organization
- Team Access and Monitor Group Permissions – Set up role-based access for your team
- Advanced Monitor Settings – Configure timeouts, thresholds, and more