This guide walks you through setting up SAML-based Single Sign-On (SSO) between OneLogin and StatusDrift. Once configured, your team members can sign in to StatusDrift using their OneLogin credentials.
Prerequisites
Before you begin, ensure you have:
- OneLogin Administrator access
- StatusDrift Organization Owner or Admin role
- A StatusDrift plan that includes SSO (Team or Enterprise)
Step 1: Start SAML Configuration in StatusDrift
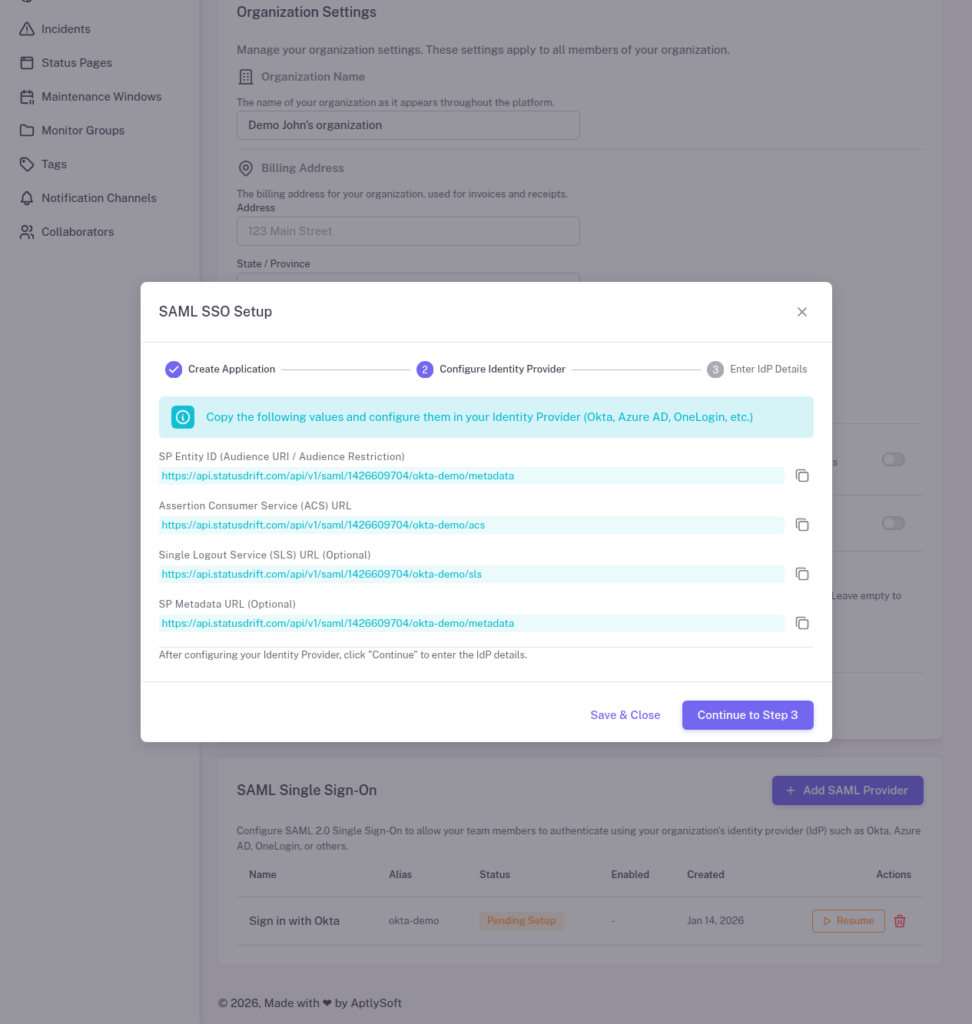
1. Sign in to StatusDrift and navigate to Organization Settings > Security > Single Sign-On.
2. Click Configure SSO and select OneLogin from the identity provider list (or choose “Other SAML 2.0 Provider”).
3. StatusDrift will display your Service Provider (SP) metadata. Keep this page open – you will need these values:
- ACS URL (Consumer URL) – The endpoint where OneLogin sends SAML responses
- Entity ID (Audience) – StatusDrift’s unique identifier
- SLS URL – Single Logout Service URL for sign-out requests
Step 2: Add a New Application in OneLogin
1. Sign in to the OneLogin Admin Portal.
2. Navigate to Applications > Applications.
3. Click Add App in the top right corner.
4. Search for “SAML Custom Connector (Advanced)” and select it.
5. Enter a display name (e.g., “StatusDrift”) and optionally add a description and logo. Click Save.
Step 3: Configure Application Settings
In your new application, navigate to the Configuration tab and enter the following values from StatusDrift:
| OneLogin Field | StatusDrift Value |
|---|---|
| Audience (EntityID) | Copy Entity ID from StatusDrift |
| Recipient | Copy ACS URL from StatusDrift |
| ACS (Consumer) URL | Copy ACS URL from StatusDrift |
| ACS URL Validator | Enter a regex pattern matching the ACS URL |
| Single Logout URL | Copy SLS URL from StatusDrift (optional) |
For the SAML nameID format, select Email. Click Save.
Step 4: Configure Parameters (Attribute Mapping)
Navigate to the Parameters tab to map OneLogin user attributes to StatusDrift:
1. Click the + button to add a new parameter.
2. Add the following custom parameters:
| Field name | Value | Include in SAML |
|---|---|---|
| Yes | ||
| firstName | First Name | Yes |
| lastName | Last Name | Yes |
| groups | User Roles (or MemberOf) | Yes |
3. For each parameter, check Include in SAML assertion.
4. Click Save.
Step 5: Get OneLogin IdP Metadata
Navigate to the SSO tab to find the identity provider details you’ll need for StatusDrift:
- Issuer URL – OneLogin’s Entity ID
- SAML 2.0 Endpoint (HTTP) – The SSO URL
- X.509 Certificate – Click “View Details” to copy the certificate
You can also click More Actions > SAML Metadata to download the complete metadata XML file.
Step 6: Assign Users to the Application
Before users can authenticate via SSO, they must be assigned to the application:
1. In your application, navigate to the Users tab.
2. Click Add Users and select the users or groups who should have access.
Alternatively, you can assign the application to all users or specific roles:
1. Navigate to the Access tab.
2. Under Roles, select which OneLogin roles should have access to StatusDrift.
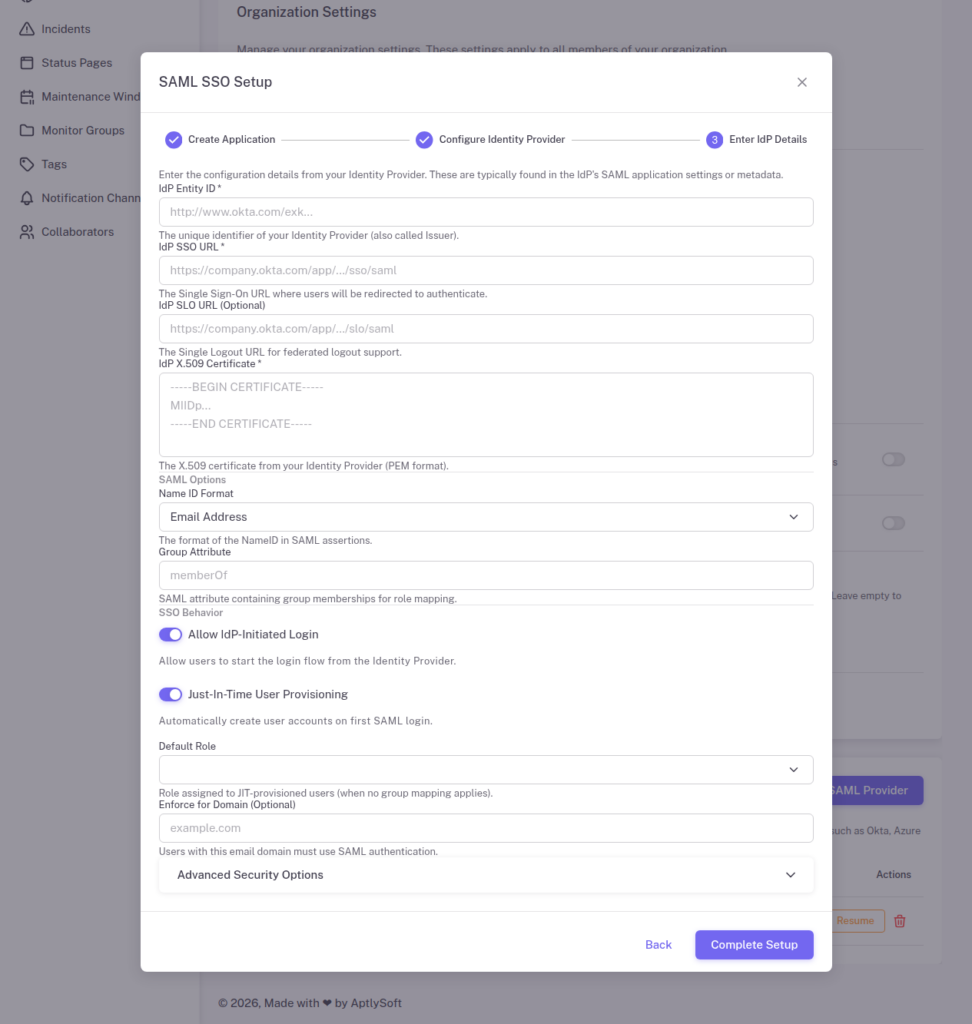
Step 7: Complete Configuration in StatusDrift
Return to StatusDrift and enter the OneLogin IdP details:
1. Identity Provider Entity ID: The Issuer URL from OneLogin’s SSO tab
2. Single Sign-On URL: The SAML 2.0 Endpoint (HTTP) from OneLogin
3. X.509 Certificate: Paste the certificate content from OneLogin
4. Configure optional settings:
- Just-In-Time Provisioning – Automatically create StatusDrift accounts for new users
- Require SSO – Force all users to authenticate via OneLogin
5. Click Save Configuration.
Step 8: Configure Role Mapping
If you configured the groups parameter in Step 4, set up role mapping in StatusDrift:
1. Go to Organization Settings > Security > SSO > Role Mapping.
2. Add mappings for your OneLogin roles:
| OneLogin Role | StatusDrift Role |
|---|---|
| StatusDrift Admins | Admin |
| StatusDrift Editors | Editor |
| StatusDrift Viewers | Viewer |
3. Set a default role for users who don’t match any group mapping.
Testing Your Configuration
Before enforcing SSO for all users:
1. Open an incognito/private browser window.
2. Navigate to your StatusDrift login page.
3. Click Sign in with SSO or enter your organization’s SSO domain.
4. You should be redirected to OneLogin’s sign-in page.
5. After authenticating, you should be redirected back to StatusDrift and signed in.
You can also test IdP-initiated login from the OneLogin portal by clicking the StatusDrift app tile.
Troubleshooting
Error: “SAML Response signature verification failed”
The certificate in StatusDrift doesn’t match OneLogin’s signing certificate. Re-copy the X.509 certificate from OneLogin’s SSO tab and ensure you include the complete certificate with BEGIN and END markers.
Error: “User not assigned to application”
The user attempting to sign in hasn’t been assigned to the StatusDrift application in OneLogin. Assign the user directly or ensure they belong to a role with application access.
Error: “Invalid ACS URL”
The ACS URL Validator regex in OneLogin doesn’t match the ACS URL being used. Update the validator pattern or ensure the ACS URL matches exactly.
Attributes not received
Verify that each parameter in OneLogin has Include in SAML assertion checked. Also confirm the field names match what StatusDrift expects (email, firstName, lastName, groups).
Advanced: OneLogin Provisioning
OneLogin supports SCIM-based provisioning for automated user lifecycle management. To configure:
1. Contact StatusDrift support to enable SCIM provisioning for your organization.
2. In OneLogin, navigate to your application’s Provisioning tab.
3. Enable provisioning and enter the SCIM endpoint and bearer token provided by StatusDrift.
4. Configure provisioning actions (create, update, delete) based on your requirements.
Security Best Practices
- Use SHA-256 Signing – In OneLogin’s SSO settings, ensure SHA-256 is selected for signature algorithm
- Enable MFA – Require multi-factor authentication in OneLogin for enhanced security
- Restrict Application Access – Only assign the StatusDrift app to users who need it
- Monitor Login Events – Use OneLogin’s event logging to track authentication activity
- Certificate Rotation – Plan for certificate renewal before expiration; OneLogin allows adding a new certificate before removing the old one