This guide walks you through configuring SAML Single Sign-On (SSO) between Okta and StatusDrift. After completing this setup, your team members can authenticate to StatusDrift using their Okta credentials.
Prerequisites
- An Okta administrator account with permissions to create applications
- A StatusDrift account with Admin role
- Access to both the Okta Admin Console and StatusDrift Account Settings
Step 1: Create a SAML Application in StatusDrift
- Log in to StatusDrift and navigate to Account Settings
- Select the Organization tab
- Scroll down to SAML Single Sign-On and click Add SAML Provider
- Enter the following details:
- Alias: okta (or a unique identifier for this connection)
- Display Name: Sign in with Okta
- Click Create & Continue
Step 2: Copy StatusDrift SP Metadata
After creating the SAML application, StatusDrift displays the Service Provider (SP) metadata. You will need these values when configuring Okta:
- SP Entity ID (Audience URI): Copy this URL
- Assertion Consumer Service (ACS) URL: Copy this URL
- Single Logout Service (SLS) URL: Copy this URL (optional)
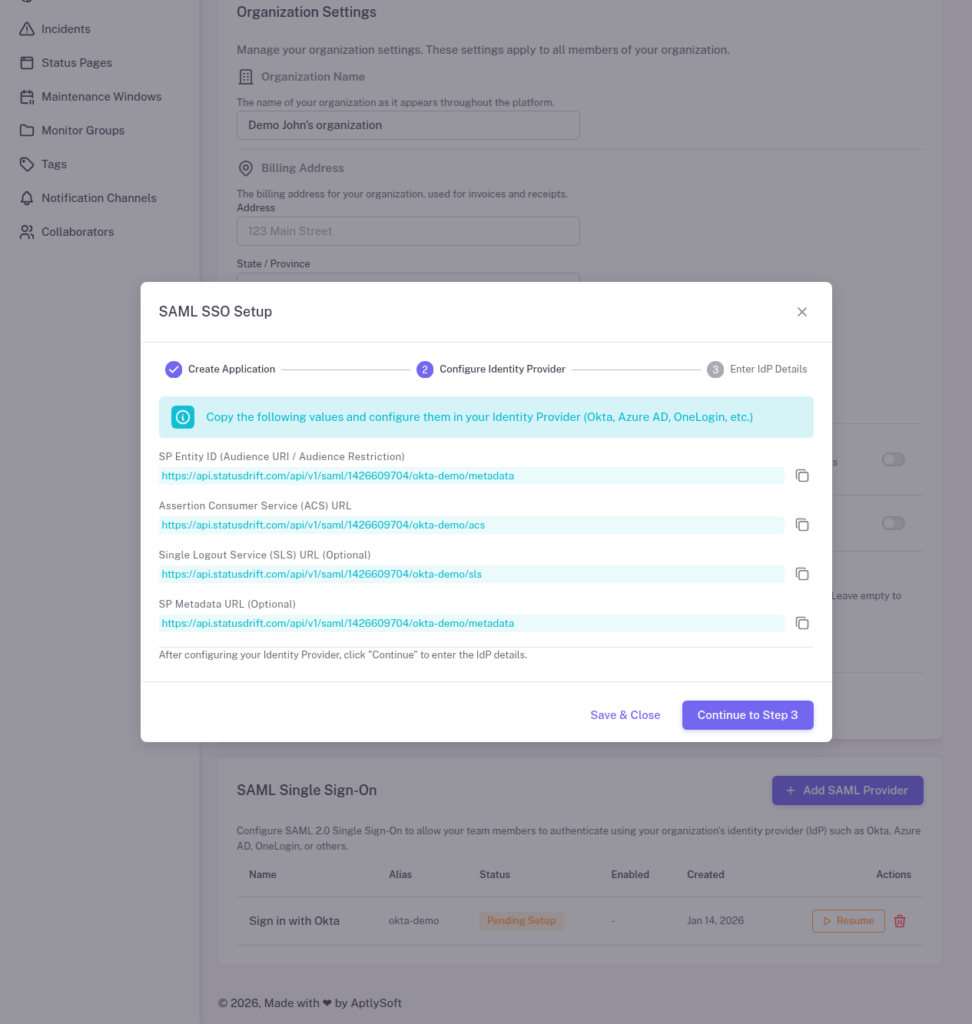
Keep this window open as you will return to it after configuring Okta.
Step 3: Create a SAML Application in Okta
- Log in to your Okta Admin Console
- Navigate to Applications > Applications
- Click Create App Integration
- Select SAML 2.0 and click Next
- Enter an App name (e.g., “StatusDrift”) and optionally upload a logo
- Click Next
Step 4: Configure SAML Settings in Okta
On the Configure SAML page, enter the following settings:
General Settings
| Setting | Value |
|---|---|
| Single sign-on URL | Paste the ACS URL from StatusDrift |
| Audience URI (SP Entity ID) | Paste the SP Entity ID from StatusDrift |
| Name ID format | EmailAddress |
| Application username |
Attribute Statements (Optional but Recommended)
Add the following attribute statements to pass user information:
| Name | Value |
|---|---|
| user.email | |
| firstName | user.firstName |
| lastName | user.lastName |
Group Attribute Statements (For Role Mapping)
If you want to automatically assign roles based on Okta groups, add a group attribute statement:
| Name | Filter | Value |
|---|---|---|
| groups | Matches regex | .* |
Click Next, then select the appropriate feedback option and click Finish.
Step 5: Get Okta IdP Metadata
- In your Okta application, go to the Sign On tab
- Scroll down to SAML Signing Certificates
- Click View SAML setup instructions or View IdP metadata
- Copy the following values:
- Identity Provider Single Sign-On URL
- Identity Provider Issuer (Entity ID)
- X.509 Certificate
Step 6: Complete Setup in StatusDrift
- Return to the StatusDrift SAML setup wizard
- Click Continue to Step 3
- Enter the Okta IdP details:
- IdP Entity ID: Paste the Identity Provider Issuer from Okta
- IdP SSO URL: Paste the Identity Provider Single Sign-On URL
- IdP X.509 Certificate: Paste the certificate (including BEGIN/END lines)
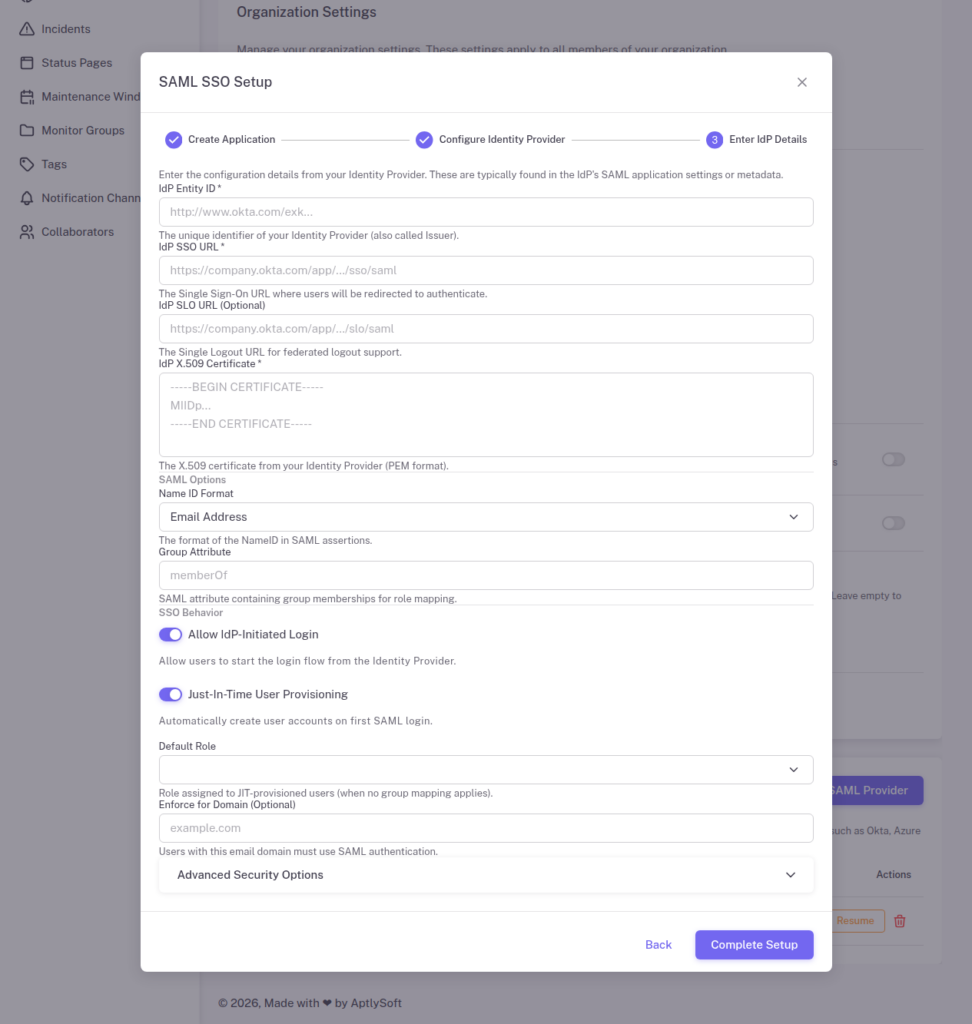
Configure SSO Behavior
- Allow IdP-Initiated Login: Enable if you want users to start login from Okta
- Just-In-Time User Provisioning: Enable to auto-create accounts on first login
- Default Role: Select the role for JIT-provisioned users
- Group Attribute: Enter “groups” if you configured group statements in Okta
- Click Complete Setup
Step 7: Assign Users in Okta
- In Okta, go to your StatusDrift application
- Click the Assignments tab
- Click Assign and select Assign to People or Assign to Groups
- Select the users or groups who should have access
- Click Save and Go Back
Step 8: Configure Group Mappings in StatusDrift (Optional)
To automatically assign StatusDrift roles based on Okta group membership:
- In StatusDrift, go to your SAML provider settings
- Click Manage Group Mappings
- Click Add Mapping
- Enter the Okta group name and select the corresponding StatusDrift role
- Set the target type (Organization or Monitor Group)
- Save your mappings
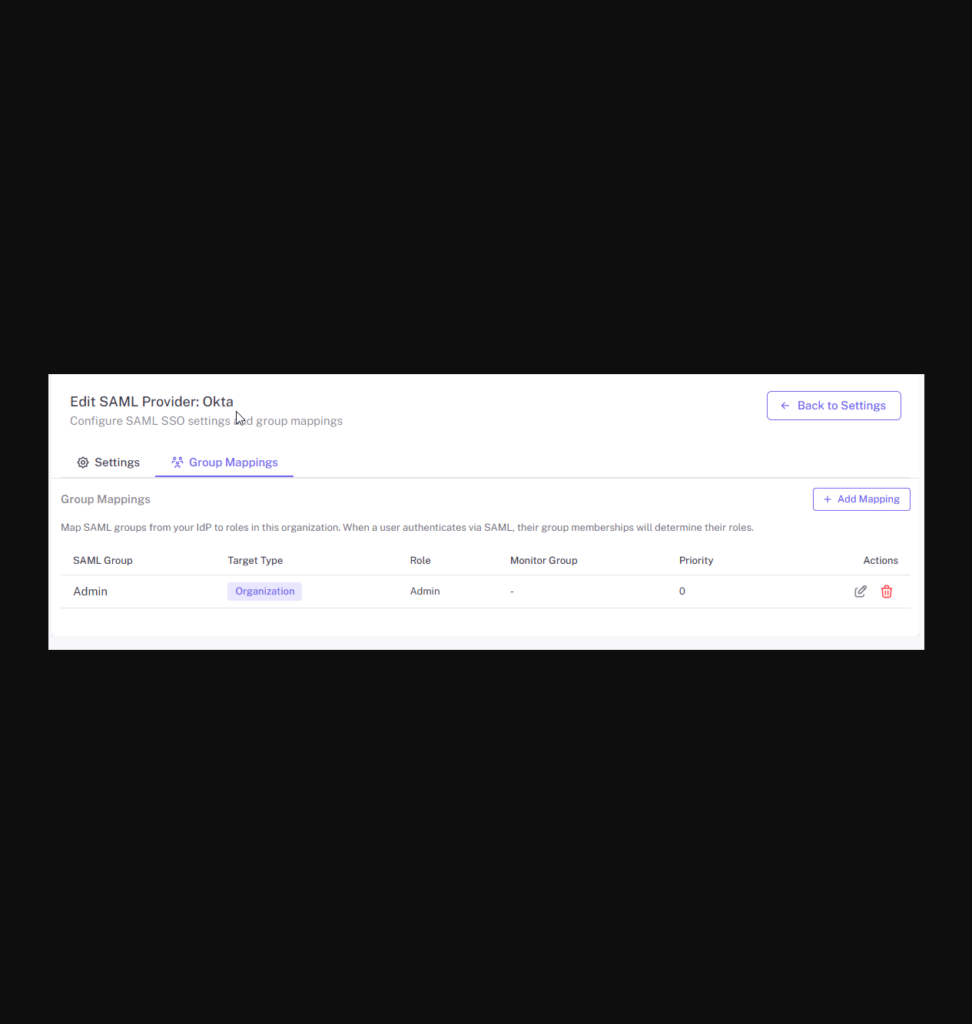
Example Group Mappings
| Okta Group | StatusDrift Role | Target |
|---|---|---|
| StatusDrift-Admins | Admin | Organization |
| StatusDrift-Engineers | Global Editor | Organization |
| StatusDrift-Support | Global Communication | Organization |
| StatusDrift-Viewers | Global Viewer | Organization |
Testing the Integration
- Open an incognito/private browser window
- Navigate to the StatusDrift login page
- Click Sign in with SSO
- Enter your organization’s SSO alias (e.g., “okta”)
- You should be redirected to Okta for authentication
- After successful authentication, you will be redirected back to StatusDrift
Alternatively, if you enabled IdP-initiated login, users can click the StatusDrift app tile in their Okta dashboard.
Troubleshooting
Invalid Audience Error
Ensure the Audience URI in Okta exactly matches the SP Entity ID from StatusDrift, including the protocol (https://).
Certificate Errors
Make sure you copied the entire X.509 certificate including the -----BEGIN CERTIFICATE----- and -----END CERTIFICATE----- lines.
User Not Provisioned
If JIT provisioning is disabled, ensure the user has been manually invited to StatusDrift with the same email address used in Okta.
Groups Not Mapping
Verify that:
- The Group Attribute Statement is configured in Okta
- The Group Attribute field in StatusDrift matches the attribute name (“groups”)
- The user is a member of the Okta group being mapped